How to Photograph the Northern Lights in 7 Steps

Seeing the aurora borealis dance in the northern skies is high on many people's “things-to-do-before-I-die” lists. And rightly so – the phenomenon is incredible to witness.
I've been lucky enough to see the Northern Lights multiple times in more than one country (most notably in Manitoba, Canada and Northern Norway), and I don't think I could ever tire of seeing them. They really are that magical!
But, chances are, if you want to see the Northern Lights, you also want some sort of proof that you've seen them. (Or, you might need some extra help seeing them, as cameras can pick up a lot more light than our eyeballs can!)
The good news is that, with the advancement of camera technology, photographing the Northern Lights is becoming increasingly easier these days. But that doesn't mean there aren't tricks to taking great photos of the aurora.

Here are some tips to help ensure that you, too, come home with Northern Lights shots that will make all your friends jealous.
How to photograph the Northern Lights in 7 steps
What you'll need to photograph the Northern Lights
In order to get great aurora photos, you will need some equipment and the ability to tweak your settings to adjust for whatever aurora conditions you're met with.
Can I take photos of the Northern Lights with my phone?
A big question these days is whether you can take Northern Lights photos (or video) with your smartphone. And the answer is… maybe! If the aurora conditions are right (i.e. the night is dark, the sky is clear, and the aurora is active), then you might be able to take phones with your phone on the right setting.
You'll still need a long shutter speed (and possibly a tripod to help) for photos, and they will come out best if the aurora is strong enough to also see with your eyes.
But the short answer is… yes! You can probably take aurora photos on your phone. But they will come out even better if you have a camera that you can control the settings on even more, and that's what the rest of this post will cover!
Also read: 9 Lies (and One Truth) People Tell You About Seeing the Northern Lights
Step 1: A camera
You will need a camera to capture the best photos of the Northern Lights. While fancy DSLR cameras will undoubtedly have the ability to capture great images, you don't necessarily need expensive equipment to get decent shots. On my first aurora chasing trip, I was shooting with a mirrorless Olympus PEN model camera with a 14-45mm and a 17mm lens, and got great shots. Others were photographing with point-and-shoot cameras and also got decent images.
I've also shot the northern Lights on an Olympus OM-D E-M5 Mark II with a 12-40mm Pro lens, and a Sony A7iii with a Tamron 28-200mm lens.
The key is that you ideally need to be able to adjust things like shutter speed and focus on your camera – meaning having a “manual mode” on your camera is vital.
Step 2: A tripod
You will be taking long exposures when photographing the Northern Lights – usually anywhere from 5 to 30 seconds. You don't want to be holding your camera during these shots, as even the slightest movement can cause blurring.
A tripod, therefore, is pretty much essential. I recommend the VEO 235AB by Vanguard, as it's very sturdy, yet travel-friendly. (Though, if you don't have a tripod, setting your camera down on a solid surface can also work in some cases; I've taken long-exposure star photos with my camera just sitting on the ground!)
Step 3: A shutter release/timer
As mentioned above, any contact with your camera during a shot can cause the image to blur and appear out of focus. Even just pressing the shutter to initiate a shot can cause unwanted motion. A remote shutter release, therefore, is probably worth investing in so that you can release the shutter without any contact with your camera.
(I used an Olympus cable release for all the images in this post, but have since purchased a Bluetooth remote for my Sony camera).
If you don't want to buy a shutter release just for a few photos, however, make use of any timer setting your camera may have. Most cameras have the ability to be set on a timer of varying lengths – even your smartphone camera. Set your shots on a 2- or 3-second delay, which should give your camera enough time to stop moving after you press the shutter button before the shot is actually taken.

Camera settings for photographing the Northern Lights
Assuming your camera allows you to manually set all options, here are settings suggestions that worked for me:
Step 4: Focus
If your camera gives you the ability to manually set your focus, do so and set your focus to infinity. Why? Because the Lights will be far away and sometimes not especially distinct. If you have auto-focus on, your camera won't know what to focus on and may just not take a photo at all.
Most camera lenses these days can focus on “infinity,” and many even have a little mark or notch denoting where infinity is. My Olympus and Zukio lenses, unfortunately, do not have these markings. For me, therefore, it was a bit trickier to get my focus right.
I tried a few different options: the first night, I played around with my focus ring, attempting to focus on stars or far-away trees once I was out on the tundra. Not ideal, though, to be fumbling around with buttons in the dark. The second night, I took my camera out before nightfall. With my camera set to auto-focus, I focused on a lamp post at the very end of the street. I then got a piece of masking tape, and noted where my focus was set. I then switched my camera on to manual focus, and voila! my focus was automatically set on infinity (or at least “very-far-away”).
Getting the focus right can be the trickiest part of photographing the Northern Lights. As you take shots, be sure to zoom in on your photos in your camera's review mode to see if your shots are coming out clear. There's no worse feeling than taking photos in the cold for 3 hours, only to realize the next morning that they are all out of focus!
Step 5: Shutter speed
In order to capture faint lights in the dark, you need to take a long exposure. The length of exposure will depend on a lot of things – how bright the aurora is, how open your aperture is, how high your ISO is, and of course the effect you want in your photos.
Anywhere from 5 seconds to 30 seconds can work for Northern Lights exposures. My best shots in Canada were taken at about 25-30 seconds.
Step 6: Aperture
In general, you want your aperture to be as open as possible (meaning the lowest F-stop number possible) for Northern Lights photos. I used my 17mm lens because it allows for a f2.8 – which lets in a lot of light. (My 14-45mm lens, in contrast, only goes down to an f-stop of 3.5.)
A photographer in our group suggested using one f-stop up from the widest setting on your camera. My best shots were at an F2.8 and F4.0.

Step 7: ISO
ISO relates to how sensitive your film (or, in this case, your digital sensor) is to light. A higher ISO will pick up on more light. One would assume that you would want to set your ISO to the highest setting possible to capture the aurora. This makes sense, but is not always ideal in practice. Because, the higher your ISO, the more “digital noise” is likely to show up in your photo.
I took photos using an ISO anywhere between 400 and 1600 just to see how the shots would come out. The ISO 400 shots are less grainy but darker, while the ISO 1600 shots are brighter but “noisier.” I finally settled around ISO 1250 for some of my favorite shots.
If you have a really great DSLR with noise reduction and other fancy settings, chances are you can use a higher ISO and still get nice photos. (When I shot the aurora on a slightly nicer camera years after this, I was able to crank my ISO up higher.)
The DOs for photographing the Northern Lights
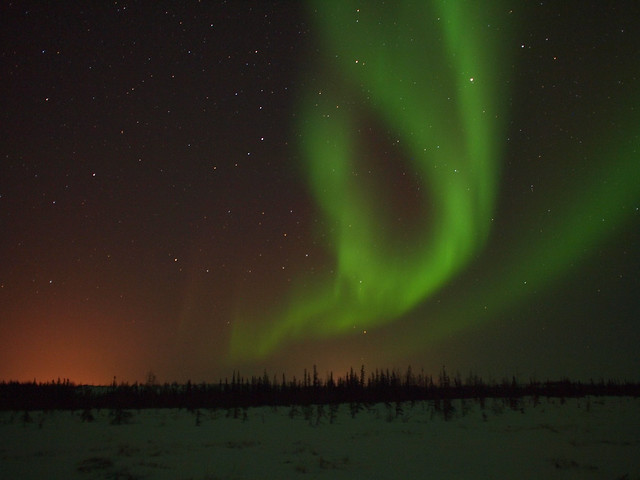
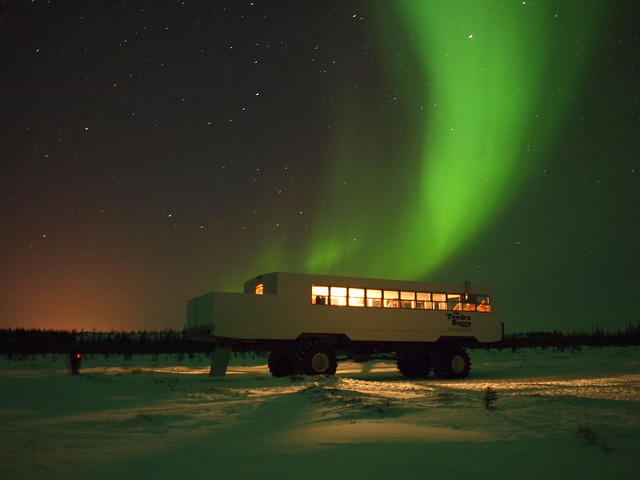
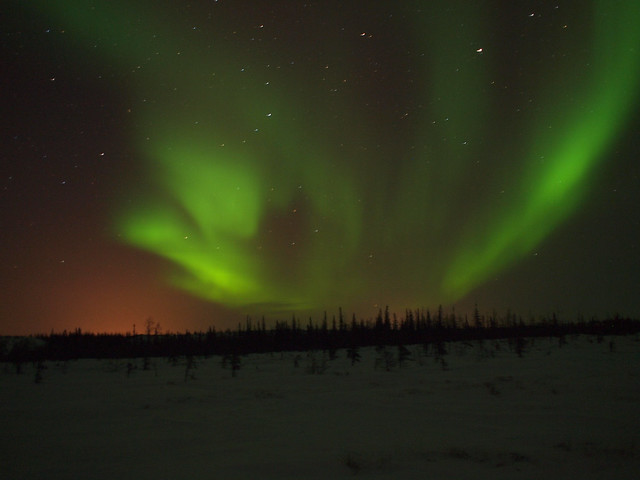
Do put something in the foreground of your photos to give a better sense of place.
Do take a TON of photos – the Lights are constantly making new shapes, and you never know what you might capture. Plus, you may need a lot of tries before you get the settings right.
Do bring a headlamp with you with a red light option; the red light won't blind your or others in the dark, and won't ruin others' aurora photos as much if you accidentally appear in one.
The DON'Ts for photographing the Northern Lights
Do NOT use your flash. Ever.
Do not use any filters you might have on your lens, as they can often leave weird striations on your aurora images.
Taking care of your gear
The Northern Lights are best seen on crisp, clear winter nights far up in the northern reaches of the world. This means that your photography conditions are going to be quite harsh (read: VERY COLD). Extreme temperatures of any sort can affect electronics, and this includes your camera.
Keep your batteries warm
The biggest challenge to photographing the Northern Lights in -40-degree temperatures is keeping your batteries warm. Make sure to BRING BACK-UPS! At least one, but ideally 2 back-up batteries are great if you're planning to be out for a few hours photographing the Lights.
Cold temperatures zap the life out of batteries. This compounds with the strain already being put on the batteries by taking long-exposure shots, and often leads to batteries “dying” prematurely.
In most cases, your battery probably isn't actually drained – it's probably just too cold to function. In this case, you need to remove it from your camera and warm it up. The best place to store back-up batteries is as close to your skin as possible in order to ensure they stay warm.
Beware condensation
Cold temperatures alone will not hurt your camera; most camera bodies these days are pretty sturdy, and can withstand anything winter can throw your way. The concern comes when you are taking your camera from the frigid tundra into a warm vehicle or building. When this happens, you have to worry about condensation, which can seep into weak spots and really wreak havoc on your camera's insides.
To avoid this happening, there are a few easy things you can do. The first option is to put your camera into a sealed plastic bag before taking it indoors. The other option is to take your camera bag outside with you, allowing it to get acclimatized to the cold. Simply put your camera back in the bag and zip it up before you take it inside. Both of these options slow down the process of warm air coming into contact with your freezing camera, thereby reducing the amount of condensation.
This process can get annoying if you're in and out a lot, however. I eventually resorted to just leaving my camera sitting on my tripod outside when I went in to warm up – though I always took my battery inside with me to make sure it didn't freeze up.
Be careful with plastic and rubber
Lastly, if you've got a tripod with lots of plastic bits on it, or a shutter release with a rubber cable, be careful with them in below-freezing temperatures. Things can break and snap rather easily when it's that cold, so you need to be gentle.
Taking care of yourself
In such extreme temperatures, you'll also need to make sure to be taking care of yourself as well as your gear.
Use “hotties”
Go to an outdoors store and stock up on those little heat packets that you can stuff into your shoes and gloves. When it's -45 with windchill, you will more than appreciate still being able to feel your toes.
Glove liners
A pair of glove liners are also worth purchasing. Chances are you'll be adjusting your camera settings quite frequently while outside – especially if it's your first time trying to photograph the Northern Lights – but taking a glove off even just for 30 seconds in such extreme temperatures can be dangerous. If you're wearing glove liners, however, you can take your bulky gloves off without exposing your skin directly to the cold and still be able to fiddle with your camera's buttons.
Headlamp
Having a headlamp with you isn't essential, but it can certainly come in handy when you're trying to adjust your camera, set up a tripod, or even just make your way through snowdrifts in the dark. Just be sure not to shine it directly at other photographers, as a 30-second exposure would definitely pick up on the extra light!
If your headlamp has a red light option (or if you can simply put some red tape over it), that's ideal, as red light does not force your pupils to adjust in the dark.
Be smart
Lastly, just be smart about the cold. Frostbite can be a real danger in many cases of Northern Lights photography, so make sure you are properly covered up. And, if you start feeling too cold (or if you just stop feeling certain extremities altogether), GO INSIDE. No photo is worth getting frostbitten for.
I have to give a big shout-out to Sean Workman from the Manitoba Museum, as well as Dan Harper of DanHarperPhoto.com for helping to teach me how to capture the Northern Lights. Sean gave us a photography tutorial in the museum's Planetarium that allowed me to figure out some settings on my camera and feel more confident about capturing the Lights. Dan was traveling with us in Churchill, and was great about giving us aurora tips and helping us out with settings on our individual cameras. Many of these tips are Dan's, augmented to work for my camera and preferences.
Do you have any other questions about photographing the Northern Lights?
*Note: I was a guest of Travel Manitoba and Frontiers North Adventures on this trip. But, as always, all opinions are my own.

Amanda Williams is the award-winning blogger behind A Dangerous Business Travel Blog. She has traveled to more than 60 countries on 6 continents from her home base in Ohio, specializing in experiential and thoughtful travel through the US, Europe, and rest of the world. Amanda only shares tips based on her personal experiences and places she's actually traveled!


[…] can dip well below zero, you definitely want to pack for it. When I was in Manitoba and out photographing the Northern Lights at night, it was -40 degrees with windchill. MINUS 40!!! I had up to 6 layers of clothing on top, […]
Thank you so much! These tips are marvelous. I am hoping to get a chance to go to Norway and/or Iceland in December or January, so I will definitely be keeping these thoughts in mind.
Thank YOU, Victoria! I hope you get the chance to put these to use!
After a few months of chasing the Aurora up in Yellowknife, NWT, I have found it’s very important to take your camera strap off if there is any wind! I had a few pictures ruined when a gust came up and the strap swaying caused just enough movement for a blurry photo. When it’s -40 C (or colder!) you don’t want to spend any more time outside in the elements then absolutely necessary!
Yes that’s definitely a good tip, too, if it’s windy!
[…] (And, for those of you who’d like to capture images like these for yourself, check out my post on How to Photograph the Northern Lights.) […]
Wow, these are great tips and your shots a fantastic. I’ve heard about the Northern Lights before but the gorgeousness you’ve captured really inspire me to take a serious look at making that one of the places to go to within the next 5 years.
The Northern Lights have been on my bucket list since before I even HAD a bucket list! Tricky to actually find them, but so worth it once you finally do.
Great tips Amanda! And great photos! Seeing the Northern Lights is really high on my list too. I have a DSLR but I need to learn more about using the different settings before I attempt anything like this. This is a really helpful post for those of us who aren’t photography experts, love it!
If you do get the chance to go chase the Lights anytime soon, definitely play around with your camera and settings beforehand. Night photography can be tricky, and you definitely want to practice a bit before you tackle the real thing!
This is an awesome post topic. i think I would add to my bucket list to have a designated photographer to take the pics so I could concentrate on the experience rather than on taking good photos. I read that people are hiring “honeymoon photographers” like they’d hire wedding photographers and honestly that seems like an awesome idea for people who hate taking photos like me.
Interesting idea! I personally love taking photos (and the challenge of taking these photos was actually half the fun!), but I can understand how daunting it would be if you’re not snap-happy like I am!
Oooohh.. totally bookmarking this!
Hopefully it comes in handy for you someday!
Great tips, and love the photos, makes me even keener to go see them myself sometime (though the cold sounds like hard work!)
The cold definitely took some getting used to! But, in the end, it was completely worth it.
Thanks for these tips! Especially the ones about the infinity focus and how to protect your camera. Very helpful. Hopefully I’ll get to use them one day. 🙂
Glad you found the tips helpful! Hopefully you get to try them out someday.
Wow what amazing tips!!! And of course, the photos are even more amazing!
Thanks, Andi!
These are awesome tips and even more incredible photos! Night photography is definitely still challenging for me, but I think I’ve learned the most from the mistakes I’ve made with it. Taking photos this spectacular is on my bucket list along with the Northern Light themselves!
Night photography isn’t easy, and I definitely wouldn’t call myself an expert. But I’ve at least got the basics down! I agree on learning the most from trial and error, though. I took a ton of bad shots in order to get the few good ones that I did!
This is a great post, Amanda. You’ve covered everything!! A few tips from me, if you don’t mind.
– It is hard to carry a good tripod on the travel. But, for tripod-photography I always keep a little joby tripod in my bag or pocket. Don’t want to advertise on your blog… google “joby tripod”, if you don’t know what it is.
– I always take a couple of boxes of ZEISS lens cleaning wipes. Those are the best!
Glad you liked the post – and thanks for adding your own tips!
I don’t usually carry a full-sized tripod with me when I travel, either (I also have a small Joby one that usually gets put in my pack), but since this trip was very photography-specific and I was already taking a decent-sized suitcase for all my winter clothing, it was no problem to take a real tripod along.
Wow, just wow. I have so got to see this for myself.
You really do!
Wow, those pictures are unreal!!! I cannot believe that something like that exists!
Thanks for the thorough photo tips! 🙂
Yes it really does exist! So amazing to see.